Home Photo Tutorials Video Tutorials Gallery Creative Resume Permissions Email Me

Faux Metal Tutorial

This was so much fun!!! My page titled The Journey (above this tut) features this faux metal. Here are the supplies you'll need...

Read More

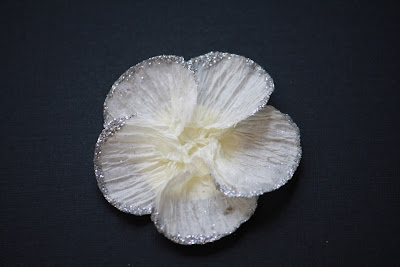
Crepe Paper Carnations

How much do I love thee? Let me count the ways!! Isn't this flower adorable!? I ran across this tutorial on the web months ago and it has been rolling around my head ever since. It is so versatile making it perfect for every one one of your gorgeous creations. Let's go!

Read More

Calla Lily

I fell in love with this flower when I saw a video for it on the Heartfelt Creations website. So, if you don't want to read my tutorial you can click here to watch it over at HC. I did distress this up a little bit, which is not on the video. All right! Let's get started......

Read More

Faux Leather Tutorial

Making faux leather is easier than you think. I know, I say that about a lot of my tutorials. Have I been wrong? LOL...

Read More

Snowy Poinsettia

These flowers are just too cute! They are beyond easy to make too...BONUS!

Read More

Emerging Color Stamping Technique

Ok, I'll admit it...I really love stamping and the more I stamp the more I want to stamp. It's a wonderfully vicious circle. Emerging Color is one of those techniques that have some very basic and constant elements to it, but the creative license is all yours in how you present it. I'm sure if you Google or YouTube you will find a ton of tutorials and a lot of them will be very similar. Emerging Color boils down to this one word: resist. This is at its very core a resist technique. The whole trick to doing this is to remember that you will work in layers.

Read More


Wednesday, December 22, 2010

Scrapbook News and Review 12 Tags of Christmas

Scrapbook News and Review is running their 12 Tags of Christmas.  Each day one of the very talented staff members at SNR creates a gorgeous tag.  Some of them even got their kids involved and they created a project as well.  If you are signed up to receive the newsletter then you are very aware of the beautiful tags that have been created so far.  I am so honored to work with these talented and beautiful people.  If you haven't already, hop over to SNR by clicking HERE and sign up for the newsletters, check out the forums or subscribe to receive the monthly magazine.  Now onto my tag as well as the tag that my kiddo made!!

I know it looks like a lot, but it really isn't.  Have you ever really paid attention to what you use when you make something? OMGosh, it blows my mind every time!  Here is the list:
  • Sheet Music - torn up into pieces because we are going to make a collage!
  • Multi Matte Medium
  • Ranger Paint Dabbers: White and Pool
  • Distress Ink: Broken China, Old Paper and Black Soot
  • Ranger Embossing Tinsel - Bridal
  • Utility Knife, Paper Distresser, Paint Brushes
  • K and Co. Holiday Sampler Pack
  • Pink Paislee Christmas ATC
  • Tag
  • Ribbon, Lace
  • Pearls
 Step 1

I love the song Imagine by John Lennon.  I downloaded and printed the sheet music for the song and then tore it up into pieces by hand.  Get your tag, your paint brush and your Multi Medium.  Start your collage by brushing some multi medium on your tag, I worked in sections.  Then brush some on the back of each piece as you lay it down on the tag.  Continue this process working your way to cover the entire tag.  Make sure to overlap your pieces a you go.  I also brushed some multi medium over the top when I was done just to make sure that none of the pieces began to lift up on me.   It doesn't matter if some of the pieces hang over the edge because you will trim that off later.

Once you have finished, get your heat gun and go over your tag.  I heated it long enough for the top of the tag to dry to the touch.  Flip it over and give the back a little bit of heat.  It will try to curl up on you.  Just flip it over and apply some pressure to flatten it back out.  The tag will still feel a bit damp, but the top will be dry.  At this point begin to work the tag between your fingers by bending it around and making wrinkles in the tag.  This will give it a nice worn look.  Now flip the tag over and using your utility knife trim off the excess paper.

Step 2

The top of the tag will have a slick finish to it from the multi medium.  I used a bit of light sanding paper and very gently went over the tag in a few places to rough up the surface.  Take your Old Paper Distress Ink and go over your tag.  Next use the Broken China and go over the edges as well as hitting some of the wrinkles.  I also used the Black Soot and just hit a few places on the edges.  Give this a little hit with your heat gun.

Step 3

Get a few stiff bristled paint brushes and your Ranger Paint Dabbers.  You are going to dry brush some paint over the top to soften it a bit.  To dry brush you place a small amount of paint on the end of your brush.  Using a paper towel brush off some of the paint until the paint coming off looks like it is soft and powdery.  Now begin to dry brush the paint onto your tag.  I used White and Pool paint colors.

After the paint has dried, cover the tag in embossing ink and then lightly sprinkle the Bridal Embossing Tinsel over the tag.  This embossing powder is really pretty.  It is clear but has fine glitter in it and gives everything a soft, shimmery glow.

Step 4

Now we are going to put everything together!!  Begin by gluing the white ribbon to the top and bottom of the tag.  Next take your lace and glue it to the backside of the tag so that it is hanging down at the bottom. I chose to add a blue cardstock border from the K and Co. Holiday Sampler Pack.  I put this at the top under my ribbon.  I love pearls and it seems like I HAVE to add them to everything.  I used a very thin string of pearls to add a little elegance to both the top and bottom of my tag.  I used foam squares to glue down my ATC to give it a little dimension and added a red transparent Dec 25 label to it.  I had some really fun ribbon that came with an order I received and used that to finish it off!


Now for the tag my daughter made..........


My daughter is 8 and loves to be creative.  She loves to draw and sew.  If you are anything like I am, you have a stash pile of "extras".  I like to make flowers and some of my own embellishments.  Some times I make more than actually gets used on my project.  She decided to go through my stash and pulled out a Christmas tree and a snowy poinsettia. 

She wanted to create an outdoor scene for her tree.  She picked out the patterned paper and wanted to coordinate light blue card stock with it.  She told me that she wanted to have rolling hills behind the tree.  Using a scrap piece of paper I showed her how to use an ink blending tool.  I am so proud to say that she did the inking on this tag all by herself!!!  She's a natural!!!   She added a snowflake sticker, the Earth in the shape of a heart with a little bingo card behind it that says Wish.  The pink ribbon is so fresh and funky.  I absolutely adore this tag!!!  She decided that she is going to give this to her teacher for Christmas.   I'm so proud of her.  She did and AMAZING job.

Thanks for stopping by!!!!
Saturday, December 11, 2010

Rejoice


This is another page I made using my December kit from Swirlydoos.  What a gorgeous kit.  I made this page for Angelica's Butterfly Challenge.

 I was racking my brain over what I was going to do for Christmas photos this year.  It's funny how inspiration finds you in some of the weirdest of ways.  I was trying to put some things together for a page and I had purchased this lovely piece of Prima Jewelry from Swirlydoos store which was laying out on my desk.  My DD walks into the room and just puts it on her head like a head band and stuck a pose for me.  (She's too much!)  She started to laugh and I said "Wait a minute....that gives me an idea."  A Christmas picture was born.  *insert a choir of Angels singing*

I emailed my friend, Mandy, and asked her if she could work some of her Photoshop magic on a few of my pics.  Click here to see her awesome blog.  She has a link to her photography site too.  She emailed them back to me and they just took my breath away.  On this particular picture she added a fairy wing, a small blue butterfly and an overall ethereal glow to the photo.  Isn't it gorgeous?!  Wowie!!!  Props to Mandy!!  Thanks sweetie~

I used two of the papers from the kit.  I fussy cut the border out of the Creative Imaginations paper and placed it over the top of a paper from Bo Bunny.  I used my white Adirondack paint and with a small paint brush I highlighted the angels wings.  I had planned on using the Prima Jewelry that my DD wore in the picture in my page.  I think it is a nice touch.

I used some coordinating paper to make a small frame behind the photo and then wet distressed the circle behind it.  The Calla Lily and Crepe Paper Carnations were made by hand and if you click the name of each it will bring you to my tutorial so you can make them too! I've also started to keep a list of my tutorials in the left hand side bar of my blog. It is near the top.  The green holly came in the kit and I had the red ribbon in my stash.


The butterfly was provided my Lisa Gregory.  She provides a set of butterflies for each kit.  I added burgandy stickles to it and clipped off some berries from one of the sprays that came with the kit.

Thank you so much for stopping by.  I love your comments.  They always bring a smile to my face and a warmth to my heart.  Have a blessed holiday!!!  Hugs~

Crepe Paper Carnations


How much do I love thee?  Let me count the ways!!  Isn't this flower adorable!?  I ran across this tutorial on the web months ago and it has been rolling around my head ever since.  It is so versatile making it perfect for every one one of your gorgeous creations.  Let's go!

Supplies
  • Crepe Paper - I wouldn't suggest the rolls of crepe paper that you buy for parties because it is much too thin.  You can use it.  I tried it and wasn't as satisfied with it.  They were still cute and will work in a pinch. The difference in weight and stiffness makes a huge difference with this flower.  I bought my crepe paper from Paper Whimsy.  This site has awesome downloadable files too!
  • Two circle punches - a 1 inch and a 3/4 inch
  • Glitter and glitter tray
  • Matte Medium
  • Fast drying liquid glue
  • Tweezers
  • Pearls for the flower center - I bought a string of pearls in the jewelry department at Michael's. You can pick up some nice stuff when there is a sale or by using one of their coupons.
 Step One

Cut out 5 of each size circle with your punches.  Just a side note, sharpen your punches first.  Crepe paper is spongy and your punches may not cut all the way through.  My punches are not a great quality so they struggled a bit.  You also need to cut out a 1 inch circle out of card stock.  This is the base that you will glue your petals to.

Make sure that all of your circles are placed so that the creases are vertical (going up and down).  There is a reason for this and it will be explained in the next step.  Using a small amount of liquid glue on the petal, pinch the bottom so that it looks like a fan (see above).  Do this to all of your petals.

Step Two

No, you aren't seeing double. LOL  Once you have glued all of your petals, go back to each one and pull at the creases of the paper making the petals fan out.

Step Three
Add some glitter to your glitter tray, or bowl.  Make a little pile with it.  Place a small amount of Matte Medium to your pointer finger.  Now touch it to your thumb so that both fingers have Medium on them.  Take each petal and place a small amount of Matte Medium on the edges by placing it between your finger and thumb. This will add some Medium to the top and bottom.  Dip each petal, like a chip, into the glitter.  You really just want to put a small amount on the edges.

Step Four

Place some glue on the card stock circle.  Begin to place the large petals around the circle.  Tuck one side of your petal underneath the petal before it.  

Step Five

Repeat the step above only this time using the small petals.  I placed a dollop of glue in the middle and used my tweezers to help me place them and push down in the middle.  You want to offset your petals, and will need to layer them the same way you did the larger ones.  I like my flowers to have a little depth to them so I made sure to squish down the little petals making them pop up a little. The last step is to glue a pearl in the center.  When everything dries you can play with the petals to "fluff" them up a little. 

You can use whatever color crepe paper you want for these.  You can use glass beads in place of glitter, or don't use any at all and use ink around the edges.  You can use a smaller flower for the center, glass beads or whatever strikes your fancy.  Really simple, totally customizable, and versatile.  What else would you want from a flower!!  Enjoy~

Calla Lily Tutorial


I fell in love with this flower when I saw a video for it on the Heartfelt Creations website.  So, if you don't want to read my tutorial you can click here to watch it over at HC.   I did distress this up a little bit, which is not on the video.  All right!  Let's get started......

Supplies
  • Lily Petals Pre Cut Stamps - You will use the largest stamp (Heartfelt Creations)
  • Perfect Petals Die Set by Spellbinders - You will use the largest die (Heartfelt Creations)
  • Cuttlebug (not pictured)
  • Glitter (not shown) and Glitter Tray
  • Paper Distresser
  • Ink (I used two: Bundled Sage Distress Ink, and Coffee Bean Archival Ink)
  • Jolee's Boutique Vintage Flower & Bud Stickers (can be bought in various places)
  • Floral Tape
  • Paint brush, pen, or stylus - something to curl your flower
  • Glue (I used Zots)
 Step One

I wanted the inside of my lily to have more of a variegated look.  I first covered my stamp in Bundled Sage and then strategically hit specific areas with the Coffee Bean.  **Tip - always start with the light color when using more than one ink.  This way you won't muddy up the light ink pad.  I had to use a paper towel to lightly blot of some of the brown ink, otherwise it would have been really dark.  I was going for a more washed out look so I didn't want super dark ink.

Step Two

Cut out the stamp using your Spellbinders die. Now cut off the bottom 1/2 inch of the flower.

Step Three

Distress the edges of the petal and crinkle up the petal giving it a worn look.  Take Bundled Sage and hit the edges and some of the wrinkles.  Remember to do the back because when you curl your lily it will show.  Add some water (for such a small piece you can use a paint brush, Q-Tip, or your fingers) around the edge of your petal.  Remember that you used Distress Ink so try not to get the center of your flower wet or you will loose some of the detail from the stamp.  Now start to work your paper to give some curl to the edges and waves to your flower.  While the paper is still damp, place your petal vertically (like above) and place your paint brush (also vertically) and roll the bottom of the flower around your brush until the bottom looks like a lily. You are rolling it from side to side and not top to bottom.

I don't have pictures of the last step, but you can refer to the sample picture at the top.  Now stake a flower stamen and using glue place the stamen inside the lily.  You can thread the stamen through the bottom of the flower.  You may also need to glue the bottom edge of your lily where you curled it around.  I cut down a wooden skewer for the stem and wrapped the stamen around it.  You can use floral wire or whatever you like for the stem of your flowers.  The last thing you need to do is wrap floral tape around everything to secure it in place.  I decided to use some Rock Candy Stickles on the inside to give it some shimmer and I also rolled the edge in some silver glitter to match the other flowers on my page.  Not something you need to do, but this just gives you an idea of how you can customize it to coordinate with other flowers you may be using.

Thursday, December 9, 2010

Holiday Sampler set to Debut!

Great news!  The Holiday Sampler for Scrapbook News and Review Magazine is set to debut this Sunday at 8pm!!  It is full of some awesome holiday projects and pages.  Trust me, the artwork is awesome!!!  If you aren't a subscriber, then click on the link to the left (or above) and sign up!!!  You won't be disappointed.

In it you will find tutorials, articles, product reviews, mixed media projects, digi projects, traditional scrappy projects and so much more!!!!  There is a member forum that is free and full of information.  Go check it out!!!

Monday, December 6, 2010

Big, Huge, GIGANTIC news!

I got the BEST news!  But before I tell you what it is you should know that I have a Scrappy Bucket List.  This is a list of goals that I have made for myself that pertain to Scrapbooking.  At the top of this list was to become a Design Team member for Swirlydoos.  I have always considered the women over there to be Scrappy Rock Stars!  They are the most talented, selfless, giving and genuinely nice women I have had the pleasure to meet.  I have grown and  my pages have gone up another level because of them.  When I was their Spotlight Artist of the month a few months back, I thought I had finally made it. LOL  This was on my bucket list and I got to put a big ole check mark next to that.  Man, I had a smile on my face like you couldn't believe.

Swirlydoos put out a Design Team call and I wasn't sure I was ready.  These ladies are rock stars.....my scrappy heroes!  With some pep talks from some very good friends, I've even asked one of them to be my life coach *coughRobincough* LOL, I submitted my application.  Now.....the wait.  Talk about cruel and unusual punishment!  The wait is over.....I MADE THE TEAM!!!!!!!!!!!!!!!!  O*M*G!!  You can knock me over with a feather!  When I got the call from Lisa Gregory I was at work.  I was practically speechless!  I ended up walking into the conference room, closing the door, letting out a silent scream and jumped up and down.  When I finished I fixed my suit and walked back to my desk. LOL!  I still can't believe it.  I'm scared and excited all at the same time.  Someone pinch me!!!!!


Sunday, November 28, 2010

Twas the night before Christmas

Swirlydoos December Kit - Divine Noel
Krissy never disappoints us with her kits and this month is no exception!  Gorgeous and glamorous; everything the holiday season should be.

These pictures are of my DD when she was almost 3 years old.  My how times flies.  I used the sketch that came with our kit for this.  Christmas glamor and glitz was what I wanted this page to look like.  I made the snowy Poinsettias and the patterned Christmas trees using molding paste and a template.  I added tutorials below this post for both of them.

I hope you enjoy the tutorials and I want you to know that it means so very much to me when you stop by.  Thank you, and happy holidays!!

Snowy Poinsettia Tutorial

These flowers are just too cute!  They are beyond easy to make too...BONUS!  I have to apologize for some of the pictures below.  I could not get a good shot for some of them no matter how hard I tried.  Ok, here we go!!

Supply List
  • Spindly Poinsettia SVG file - you can buy a set of 3D winter flowers (on the cheap) here SVG Cuts
  • Cricut cutting machine (not pictured)
  • SCAL or MTC software (not pictured)
  • Heat Gun (not pictured)
  • Glitter - I used red and a white, but my white had splashes of color in it so it's not a true white
  • Glue - Glue stick and Liquid glue. I like the liquid glue from 3M.  It dries quickly
  • White Puffy Paint - it is by Tulip and can be found in most craft stores
  • Tweezers and a Stylus
  • Pearls - for the flower centers
  • Bundled Sage Distress Ink and an applicator
 Step 1
Open up the Spindly Poinsettia file in SCAL or MTC.  Cut out as many sets of the flowers as you want. You need the larger petals (above) and the smaller, center petals for each flower.  I used white card stock for mine.  Carefully apply the Puffy Paint around the tips of the flower and sprinkle glitter over the paint.

Next, using your tweezers to hold the flower in place, use your heat gun to "puff" the paint.  You can tell when it starts to puff because it pops right up like popcorn!  If you are anything like me, you get better at puffing the paint and more of a feel for it as you go along.  Don't worry, you can go back and heat your flowers again and the paint will puff.

Step 2
Take the smaller petals and using your ink blending tool, apply a light coat of Bundled Sage Distress Ink.  I was going for a lighter look for my flowers, but you can go as heavy as you want.  After you have the color the way you want it, use your glue stick and cover the entire thing in glue.  Place it in your work tray and sprinkle with glitter.  Apply a small dot of liquid glue to the center of the large petals.  Using your tweezers place the smaller petals on top, offsetting the petals.  Add a pearl to the center.  Once everything has tried use your stylus to lift up and slightly bend the smaller petals making your flower 3D.

You can add as many layers of petals as you wish.  I kept it to 2 because I wanted a visually light flower. There are a ton of variations for this flower and this is just one of them.  Thanks so much for stopping by!!

3D Stenciled Embellishments

One of the easiest projects I've been really getting into lately is making 3D designs using my templates.  I know it is hard to see from this picture, but you'll have to trust me, there is some depth in that design.  This project is so super easy that I just had to share it with you.


Here are the supplies you are going to need:
  • Bowl, Pan or anything that you can use for glitter
  • Stencil - mine is from Layers of Color
  • Light Molding Paste - mine is by Golden
  • Palette Knife - you could use an old credit card, or a sturdy piece of chipboard if you don't have a knife
  • Glitter
  • Item that you want to embellish.  Mine is a Christmas tree for a page I'm working on.
  • Non-Stick Craft Mat
  • Masking Tape
Step 1
Put your card stock on your non-stick craft mat and position your template until the design is where you want it.  Use masking tape to secure the template to your craft mat.

Step 2

Using your palette knife, very carefully spread the molding paste over your stencil.  Something really important to note: when you are working with a stencil, especially one with an intricate design, the template may have a tendency to lift up making it so that your paste goes underneath the template.  For this reason I will first put a thicker coat over the project and not apply a lot of pressure.  Think of putting frosting on your cake.  Then I will carefully and slowly begin to wipe of the paste until there is an even layer over the template.  

Now very gently hold your stencil and remove your tape.  You don't want to jiggle the template or it will smear your design.  Now begin to lift off your template.  Your project may stick to the bottom so very slowly peel away your project.  Now put it in your work tray and sprinkle with glitter.  Do not press the glitter in place.  Lift your project and tap off the excess glitter.

Set your project aside to dry and harden.  The paste is pretty thin so it shouldn't take more that 20 minutes. It helps to make your project first and then while it is drying you begin work on the rest of your page. 

This is such a versatile project.  You can mix in some color to your molding paste prior to using it, you can use Perfect Pearls or Pearl Ex, ink it, mist it....the list goes on.  Use your imagination but most of all open up a jar and just play.  Have fun and thanks for stopping by!!

Saturday, November 13, 2010

Postcard from Winter

This is another page made with my November kit from Swirlydoos.  This is for Angelica's Butterfly Challenge that she hosts every month.  This photo is nearly 4 years old.  It's hard to believe.  This was a pic I took at my DD's 5th birthday party.  Seems like yesterday.  We had her party at the Nature Center which is just down the road from our house.  The man from the center took the girls on a hike through the woods and was pointing out to them a beaver damn that was in a frozen pond.  It looked so beautiful.  Like frozen motion.  Really pretty.  That day was really windy and cold so I wanted my page to reflect how beautiful winter really can be.  Ice looks like dangling crystal and when the moon is bright is casts a blue hue over the snow. So this is my postcard from winter.


I made the flowers out of acrylic and vellum.  I've been wanting to make acrylic flowers ever since I saw one made by one of the most talented ladies in the craft, Irene Tan.  I really love how vellum adds a luminosity to anything it is near.  I used a Tim Holtx Sizzix cutting die, his grungy flowers for the entire flower.  I used the acrylic for the medium sized flower in the picture.  I cut and then embossed the acrylic using my Cuttlebug.  Then I grabbed Silver and Stream Alcohol Ink.  I added more silver to my pad than I did the stream color and then just blotted and twisted to give the acrylic a swirly look.  Then I got my tweezers and my heat gun and started to heat the acrylic so that I could bend the leaves.  I need to tell you that any embossing I did, was removed by the heat gun.  The acrylic becomes floppy and relaxed.  The relaxed part is what did away with the embossed features, so try to remember that when you do this. Embossing is futile if you heat it.   Then I glued the acrylic to two of the vellum daisy-like flowers.  Then I took the smallest flower that was cut from the die, also in vellum, and glued that to the top of the acrylic flower.  I added a pearl and some diamond stickles and there you have it.  Easy Peasy!!!  Really!
Thank you so much for stopping by! 

Sunday, November 7, 2010

My Beautiful Princess


This is a picture of my DD on the stone veranda wall at Boldt Castle.  I can only imagine what she must be thinking and wishing at this very moment.  This was such a fun day trip for us.  She LOVED the castle.  What little, or big, girl wouldn't? LOL

I made this page for a challenge at Swirlydoos.  Mandy is running one of the group challenges this month and her challenge was to use curves!  No...not like that!  Circles, solid and a loop and for an extra point we needed to use something that you wouldn't normally use on a scrapbook page.

The patterned paper is a combination of a past kit and the current kit.  The black paper is made by Glitz and the white paper is made by Pink Paislee.  It is actually the back side to one of their resist papers.  I love the old, fancy-schmancy handwriting.

I handmade the Calla Lillies using a stamp from Heartfelt Creations.  I used the Spellbinders Dies that coordinate with the stamps to cut out the shape.  I also used an embossing powder by Ranger called Bridal.  It is so pretty.  It has really fine glitter in it and when heated you end up with a glowing, glittery shimmer that is so soft.  It was hard to get a picture that does it justice.  You have to take my word for it.  It is very pretty.  I also used it on the chipboard word "Beautiful" by Dusty Attic.  First I used an Adirondack Paint Dabber in White and then while the paint was still wet I put the Bridal Embossing Powder on it and embossed it.


The leaves I hand made using Fimo Clay and Perfect Pearls.  I used a leaf mold made for jewelry that also had a built in embosser.  The embosser gave the leaves all of that lovely veining.  After I cut them and embossed then, I then used copper and green Perfect Pearls to give them that autumn feel.  I shaped them by hand in order to five them a more dimensional look.  All that was left was to bake them for 30 minutes and then they were ready to put on the page.  I am in love with clay and will certainly be working it into my pages going forward.


Thanks so much for stopping by.  It really means a lot to me when you do!!!  Hugs!!

Wednesday, November 3, 2010

Curiouser and Curiouser


Swirlydoos November Kit

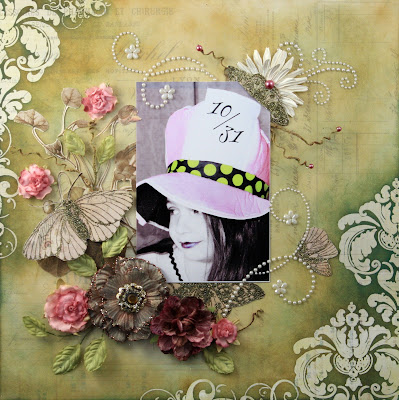
For Halloween my DD was the Mad Hatter. I used PSE8 to make the photo black and white and then I erased the layer to reveal the original color on her hat and lips.  I really love this photo.

The November Swirlydoos kit came with Pink Paislee's Parisian Anthology resist paper.  I love the freedom you get with these papers!  You can ink, mist, paint and a ton of other things to this paper and the resist stays white.  The darker you make the surrounding paper, the more the resist design pops.  I used Distress Inks on this and just kept blending until I was happy.  Then I took a slightly damp paper towel and lightly rubbed the entire page.  This does two things; 1) it blends any harsh edges from the ink blending tool and really softens the overall look, 2) it cleans any residue on the resist.

I took a sheet of paper from my Mariposa Stack.  LOVE this stack.  I've used this paper more than any other line of paper I own.  I found some gorgeous, gold-glittered butterflies and fussy cut them off the page.  I used one of them for the photo corner.  I found a flower in my stash, folded it in half and placed it behind the photo corner.  I took another butterfly and cut it in half and used it as a flower bud.  I used another one at the bottom of my photo behind the flowers.  


We got some seriously gorgeous flowers in this month's kit.  Along with the flowers was this beautiful, natural looking flower branch with those pretty pink roses in our kit.  I deconstructed it and used the pieces around the page.  I added some pearls and flourishes and that's it.  There really is not a lot of things on this page.  The resist paper really brings its "A" game.


Thanks so much for stopping by!!!!

Sunday, October 31, 2010

Wonderland Box & SNR Exclusive Sneak Peek !!!

Happy Halloween Bloggers!!!!  Scrapbook News and Review's next issue is set to debut today!  In this post I've included a few projects that will be in this new issue from two other incredibly talented staffers!!!

This is my Wonderland Box.  It is only the second altered box I've ever done and I had a great time making this.  Who doesn't love the Halloween in Wonderland paper from Graphic 45?!  So whimsical and rich in color.  It really wasn't all that hard.  All you have to do is 1) find a box, 2) paint the box, and 3) embellish.  That's it!  Ok, I did lightly sand the box and cover it in gesso first, and ink, paint and mist the embellies, but that's it!  I promise!!! LOL


I went through Micheal's and found this cute little bat and that medallion was on sale in the jewelry section. I thought that the Dusty Attic iron gate and tree branch went really well with the paper.


This is my DD's eye that I cut out of another photo.  Don't stare at it for too long because it is enchanted and you will be hypnotized into thinking you are Sister Maria in The Sound of Music and you will go skipping through your neighborhood twirling and singing!!! ......Ask me how I know.... LOL!!  It fit perfectly inside the Tim Holtz Metal Frame Plate.  I glued it to the back and then filled it in with Glossy Accents.

  
Aren't those metal corners awesome!!!!  They are really heavy and just beautiful in real life. 

This is the inside of the box and you are looking at the top.  The paper is yummy.  It is flocked and feels all velvety.  I added a small mirror I also found in the jewelry isle.


This is the inside, bottom of the box.  I carried the flocked paper down to the bottom as well.  Since I am one of those people who doesn't like to have trinkety things just hanging around the house UNLESS they have a purpose, I decided to make this box "work" during Halloween.

I took the playing cards that came in the paper stack and made them sturdy by gluing a thin piece of cardboard to them and then glued black card stock to the back of that.  As you can see, I took some Halloween ATC cards and glued them on the back.  We are also using these cards for our favorite Halloween recipes as well as recipe cards for potions and spells!!!  Mwah-ah-ah!!!!!  My DD and I went foraging through the woods and took pine cones and pulled the "scales" off of the open pine cones.  We put them in a small velvet bag and these are now "Dragon Scales" to be used in one of the fake potions.  We also made unicorn horns out of baking clay, but they seemed to have disappeared....hmmmmm.  Anyway, this is now a really fun Halloween box that pulls double duty and holds all kinds of treasures inside!!!!

NOW, for the Scrapbook News and Review Sneak Peak......drum roll.........

This is a layout of a very dear friend, Mandy Harrell.  I love her to pieces and her work is nothing short of inspiring.  I am forever stalking her blog and her work and pouring over them inch by inch.  If I could just get inside her head, I would be rich indeed!!!  Here is a page that she submitted in the Masks and Stencils section of the magazine.  She does Steampunk like no one else!!!  Girlfriend has it going on.  Isn't it gorgeous?!

I love the Mixed Media section and I am such a fan of the staffers in this area.  They inspire me so much!!!  I've actually decided to jump in this area and learn and play.  They are so generous with their skills and talents.  Check out these little inchies from another incredibly talented staffer, Heidi Myers.  Aren't they awesome??!!!


What are you waiting for?? Head on over to Scrapbook News and Review and get inspired!!!!