This is a photo of my DD and DH while we were at the Outer Banks a few years ago. I've been wanting to scrap this for a while. I created the book cover using the card stock we received. I used the small Prima stamp with text on it that came in the kit along with another small stamp by Prima that has branches on it. I then distressed the cover and finished it off with Vintage Photo ink. The edge around the window has some Vintage Photo ink and Distress Embossing Powder. I inked the Dusty Attic hinges and then used a glue pad and the small Prima text stamp. Then I dusted some gold Perfect Pearls over the stamped image and finished them off with Liquid Pearls that, you guessed it....came in the kit! I painted the thickers white and then dusted them with the white Fairy Dust Glitter we received.
This is another photo I took while we were at the beach in the Outer Banks. My DD was spinning, twirling and dancing as the waves were coming up onto the sand. I made the flowers out of the card stock and a stamp from Heartfelt Creations. I used the coordinating Spellbinders Die set and cut them out. I inked them up a little more and then edged them in Fairy Dust glitter. Those little Petaloo flowers fit just perfectly with them.
Our Technique Kit this month is called Chipboard Palooza and not only does it include some gorgeous Dust Attic, but it also includes a white Adirondack Paint Dabber, Copper Alcohol Ink, Smooch Paint, Glitter and lots of little pearls.
I painted the Dusty Attic gate with the white paint. Then I went over some areas with the Copper AI, and a few other places using the green Smooch paint. I finished it off by adding some Distress Embossing powder. A very cool thing happens when you emboss over paint; the heat makes the paint bubble and in the places where your embossing is sparse the paint will actually come to the surface and give you this really cool oxidized appearance. I decided to embellish it further by taking apart a cameo broach that came in the kit, and used the pearls and one of the jewels. I embossed a transparency with Ranger Bridal Embossing Tinsel and placed it behind the gate.
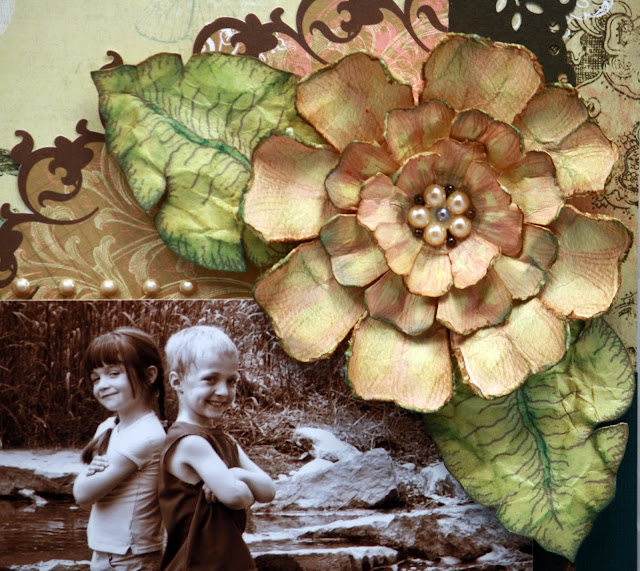
 This is such a fun photo. I remember the day I took it. They don't look like they are up to anything do they? Right......... This is my DD and her cousin. This paper is the perfect fit for outdoor photos. I decided to use the same flower stamp and die I used on the page above, but made the flowers a bit more simple. I inked them up a bit with some Broken China and also painted them using a Magical Mica that we got in the Embellishment Add-On. Aren't the leaves awesome! This is another stamp from Heartfelt Creations and again, there is a matching die. After I stamped and cut them out, I sprayed them with some green Glimmer Mist and crumbled them up while they were still wet. I hit the wrinkles with Pine Needle distress ink and then edged them using Vintage Photo. I used a Fantastix and Pine Needle ink to color the veins going down the center.
I made the faux leather tag using Fimo Clay and will be doing a tutorial for Swirlydoos on how to make it. It looks real doesn't it?
This is a photo I took while we were walking through the trail that connects our property to our neighbor's. I used a Florabella action on it in Photoshop to mute the leaves and make my DD stick out a little more. I kept thinking that this page needed a shot of color, so I took what was left of my card stock and cut the daisies using my Tattered Florals die. I misted the paper with Lilac Glimmer mist and then added some Dusty Concord distress ink. I wanted the centers of the flowers to match the beaded centers of the Petaloo flowers. I added a bead of glue to the center and then lightly dropped some little white beads onto it. I didn't want to change the shape of the glue so I had to go slow.
I LOVE the cameos that came in the kit. I think I have added one to nearly every page I made.
This is my take on this month's sketch. Once again, it took on a life of it's own. I broke down and bought a Silhouette. Overstock was having an amazing sale and it really was just too good to pass up. While browsing their download store I came across these tags and knew I had to find a way to use them. Of course I had to make them huge to fit my photos, but I really like them. You guessed it, more photos from the Outer Banks. This was the first time she had seen the ocean up close and personal and you can tell by the look on her face that she thoroughly enjoyed it.
Chipboard Palooza starts today at Swirlydoos. It is a fabulous contest!!!!! Hop on over and join us.
Thanks so much for taking the time to stop by. I appreciate it more than you know.
XO,
Lisa


5 comments:
Just like I said....GORGEOUS!!! I don't know which one is my favorite! These projects ROCK! I am especially lovin' that kite!
I can't wait for your tutorial on the Fimo tag! It really gave your page the extra Swirly touch! I really adore each beautiful page of art!!!!!
Whoa! Your designs are simply GORGEOUS!!! Love the photo of you DD reaching out to the kite! How clever!! Thank you for the inspiration!
Stunning job Lisa~I am with Robin...I can't choose a favorite either!
OMG stunning stunning work here.............love everything that you created. I will see if I have time to play around and try doing something for swirlydoos challenge. Looks like alot of fun!
Post a Comment